Search This Blog

Wednesday, February 15, 2017

Perfect Brownies

Do you have a perfect brownie recipe that you like?  Wanna share it? I've had a favorite recipe for years that I really, really, really like and I usually make it anytime someone asks for brownies but it makes so many!  This beautiful brownie recipe here is rich, fudge-y, mocha-ish and will bring you lots of compliments.  However, if you want a brownie that's a perfect after dinner dessert, please keep reading!


I found this recipe on a lovely website called cafedelites.com.  Lovely, I tell you! But, you know me and I can't leave a good thing alone!  I didn't change much, but it's a change.  So, here's my adaptation of this wonderful recipe.

You'll need:

2 large eggs, beaten
1/2 cup all-purpose flour
1/4 cup unsweetened cocoa powder
1/4 cup dark unsweetened cocoa powder
1/4 tsp. salt
1 1/4 cup granulated sugar
1 tbs. vanilla extract
1 tbs. vegetable oil
1 stick butter, melted


Preheat your oven to 350°F and grease an 8x8 pan.  Do not double the recipe and put it in a 9x13x2 pan.  It doesn't work.  Just saying. 

Bring eggs to room temperature, crack into a large bowl and beat for about a minute on high speed with an electric mixer.  Or your hands.  I tried it both ways, it works.

Melt butter, add oil and sugar to it. Mix really well.  Add eggs, mix really well again.  Add flour, cocoa powders, salt and vanilla extract and mix until incorporated, but don't over mix!  This will cause cake-y brownies if you do!

Pour into pan and bake for about 25 minutes.  Now, here's the hard part.  Allow them to cool completely.  They're gooey and meant to be so when they're still warm, well, they're great with ice cream!

As you can see by the picture above, I sprinkled a little powdered sugar on mine and served with fresh raspberries.  BUT, I can tell you that it's also great frosted and or served with fresh strawberries.

Now, speaking of pictures.  You might wonder why there are no pictures other than the one above.  Well, I had a really, really rough day at work, came home and cried my eyes out as a de-stresser, found out hubby had bought me roses and that made me cry even more but in the process of making the brownies, I forgot to take the pictures because I managed to break a couple dozen eggs just before I started baking!  I left them in hubby's man-cave fridge and they froze and broke!

I know, no sense crying over spilled milk, but broken eggs?  Yes!  A great reason to cry!

Note:  From the original recipe, all I changed was splitting the cocoa powders in two and using half regular and half dark.  I also used regular granulated sugar because I couldn't find caster sugar as the original recipe called for.  Other than that, I stayed in script.

I made the recipe a couple of times (hence the crying over broken eggs) and I found that I like my version just slightly better because I like a bite to chocolate. No matter how you like it, if you follow the directions, you can't go wrong with this perfect brownie!


Tuesday, February 14, 2017

Bourbon Balls


Happy Valentine's Day to you!  How am I celebrating?  Hubby and I went out Saturday of last week and celebrated.  No gifts this year.  Well, that was our intent.  Then he reminded me that I didn't make bourbon balls for Christmas and I did have the mixture in the pantry!  The funny thing is, I don't normally make a small batch.  The original recipe makes about 100!  So, I did it!  I measured out the ingredients to my bourbon balls!  I think I have it down to a much smaller amount.  You get to be my guinea pigs!

I've been promising for a while that I'd post this and I do my best to keep my promises!

Bourbon Balls...mmmm
So, please let me start by saying way in advance, that I don't make mine like most recipes I've read.  They will tell you to soak the pecans in bourbon overnight.  Uhm, no.  I soak mine much longer, but that flavor will really be up to you, so soak away!

To make the pecan base, do the following:

Take one cup chopped pecans and place in a non-stick skillet on low heat and slowly toast.  You can do this in the oven, too.  Be careful not to burn them! Once they're toasted, place them in a glass container with a lid and pour 1 cup bourbon over them while they're still warm.  The heat has opened the skin up on the pecan and this allows the bourbon to soak into it.

Bourbon balls....I'm making about 100 here!

What kind of bourbon(s)?  That's up to you.  I use a blend and no, I won't disclose it.  Sorry.  My signature flavor took a while to find and I'm a little protective of it. That being said, place the lid on them and place them in a dry, cool place.  I have to hide mine from hubby sometimes.  He thinks they're great snacks.

This makes me want to do a tongue twister about butter.  Do you know the one I mean?

When they're ready to your preference, you'll need the following:

1 stick of butter, softened to room temperature
1 lb (3 3/4 cups) powdered sugar
Bourbon/pecan mixture (should use about 3/4 of it)
3/4 cup whole pecans
18 oz. chocolate chips or melting wafers
Wax paper

Again, I use chocolate chips and I blend mine between semi-sweet, bittersweet and milk chocolate, using the last one sparingly.  I like a dark, dark chocolate, but not quite sugar-free.

Now this is where I'm probably going to really stray from the other recipes out there.  Beat your butter with an electric mixer and add your powdered sugar. Very slowly add your bourbon/pecan mixture.  If it's too wet, add a little more powdered sugar.  I usually add the pecans only first and the liquid from the soaking mixture as a last resort because trust me, these babies will stand you on your head!

Uhm, not kid safe. 
The caption above?  Please be mindful when sharing this lovely concoction!  A few years ago I sold these at a craft fair and I labeled them "for adults only" but folks were sending their kids to get them for them and they were getting eaten before reaching mom and dad.  There were some very happy kids there!  So, you've been warned.

Your mixture should be like a thick frosting.  Too thick to spread or pipe.  Taste it if you must.  A story for another time...I've never tasted my own bourbon balls!  No lie!  Hubby taste tests mine for me.

Just perfect!
Place plastic wrap over this beautiful mixture and put it in the fridge for about 30 minutes.  You want the butter to have time to firm up.  When you remove it, get ready to work quickly.  Using a small scoop (mine's .375 oz.), fill scoop full and release into a second bowl. Once you've gone through the mixture, place it back in the fridge for another 30 minutes.

♪...I'm in heaven...♫

While the bourbon ball mixture is firming in the fridge, melt your chocolate. Place a pan of water on the stove and bring to a simmer.  Lower the heat.  (Here's what I recommend doing versus what I do!  Only melt your chocolate about 1/3 at a time.  That way when the inevitable happens and you get the mixture in it, you don't have to throw out all of the chocolate.  Do I do this?  Not always.  Now, back to your regularly scheduled program.)  In a glass or metal bowl that's bigger than the pan, place your chocolate chips and set it on top of the pan of water.  DO NOT allow the water to boil or steam as it can burn your chocolate and you get to start over.  Not that I've ever done this!

Let it melt very slowly.  Once it's melted, remove mixture from fridge and working very quickly drop a ball into the chocolate and using a fork, dip them as quickly as possible and without getting the mixture into the chocolate more than necessary as it can cause it to seize!

As soon as they're covered, remove them from the chocolate and on to a piece of wax paper and place a whole pecan on top of it.

Depending on how well you followed directions and/or how much of the filling you've eaten, you should have about 32 bourbon balls when it's all said and done. Is it worth the effort?  The recipients of these lovely confections seem to think so!  Don't be surprised when you suddenly have more friends than you previously thought!  

Doritos Chicken Casserole

Let me start by saying that before last night I'd never had this wonderful concoction.  It was a blast from my hubby's past that came about when we passed the chips aisle at the grocery last Sunday.
Doritos Chicken Casserole
He was reminiscing about dishes his mom used to make when he mentioned this. I whipped out my handy smart phone and looked up a recipe and found that there were many versions to choose from.  So, questioning him, I made one as close to what he could remember from his childhood.


So easy to put together!
I might've gotten ahead of myself in taking pics because I was starving when I got home from work last night.  Here's what you'll need:

Preheat oven to 350°F and spray a baking dish with baking spray.  This makes a 9x13x2 dish.

3 1/2-4 cups chopped chicken (I used a rotisserie that I shredded)
2 cups cheddar cheese (or your favorite!)
2 small cans or one large can cream chicken soup
1 cup sour cream
2 cups corn OR tomatoes with green chiles, drained
13.5 oz. bag Doritos chips, crushed and divided

So, now the fun begins.  In my top picture, you'll notice the corn is on the side instead of in the dish.  That's because I forgot to add it to the mixture!  I told you I was in a hurry!!

Yummy!


After spraying your dish, put half of the crushed chips in the bottom.

Crushed Doritos
Now, mix together your cream of chicken soup, sour cream, choice of veggies and 1/2 of the cheese.  Drop by spoonful on chips and spread evenly.  I sprinkled a little more cheese.

You can never get too much cheese, right?
Now, top the mixture with the remaining chips and cheese.

See, never too much cheese!
I ran out of cheddar because I put it in the middle.  Oops.

Cover pan with foil and bake for 20 minutes.  Remove foil and continue to bake for an additional 15 minutes.

OH MY WORD!

Okay, before I get yelled at, this is not health food!  You can have it in moderation OR you can do what I did!  Use low(er) fat items.  I substituted a 97% fat free cream of chicken soup for the regular version.  A big save.  I also used lower fat sour cream.  It tasted great and worked out just fine!

I'm not sure about low fat cheese.  It might work.  The chips?  Is there a lower fat version?  Yes!  I just researched and found that Doritos offers a "Lite" chip!  I'm not a chip person and was surprised that I liked this.

Chicken?  Like I stated above, I used a rotisserie chicken from the deli of the local grocery store.  I removed the skin and bones and chopped up dark and light meat together.  You can use all chicken breast or all dark meat.

The dish is so versatile that some added extra garlic or onions to the mix.  I didn't.  I didn't add salt or pepper or any spices. I figured that between the sodium of the chips and the condensed soup that we wouldn't need any!  And for my taste, I was right.

Since I forgot to put the corn in mine, I served it on the side with biscuits.  It's really rich so you don't need a lot, but it served its purpose.

So tell me, have you made this before?  Going to make it soon?  Feedback, please.

Monday, February 6, 2017

Beef-a-roni...Childhood Favorite Made Better

Did you have this for dinner?  For school lunch?  This was one of my comfort foods growing up and if I'm honest, it might still be.  It's simple, so easy to make and extremely tasty.  While this is cooking,  you can prepare a side salad and have dinner ready in about twenty minutes!

Beef-a-roni with Parmesan

The best part about this recipe?  You can make it much, much healthier.  I used lean beef but you can use ground turkey, ground chicken, pork...stop me before I sound like Forest Gump!  Or you can use a combination of them!  Here's what you'll need for about 8 servings:

1 lb. large elbow macaroni noodles
1 1/2 lbs. ground beef
15.2 oz. can tomato soup
1/2 cup ketchup
1/2 onion, minced
1 cup water reserved from pasta
2 tbs. garlic powder
Salt and pepper to taste
Parmesan cheese

I've found that it takes about the same time for 1 1/2 lbs. ground beef as it does for pasta to cook, so, I stair step mine by putting the meat on the same time as I put the water for the pasta on to boil.


The package said this was lean beef, but I drained a lot of fat from it.  A lot.  Okay, enough grumbling.

Brown the beef with the onion, garlic, salt and pepper.  While this is cooking, put water on to boil for pasta.  Once it's at a rolling boil, add a healthy pinch of salt for seasoning and add the pasta.  Stir well and lower temperature.  If your directions state to cook it for 15 minutes, cut the time to 13.  Trust me.  While the pasta is cooking, toss together a healthy side salad and butter your favorite bread for this lovely meal!

Pasta's on!

You can use any pasta...wheat, macaroni, penne, shells...I used the rest of my penne and shells here.  The bigger pastas hold the sauce better in my opinion.

Browned beef, tomato soup and ketchup. Mmm.

Drain the fat and add the tomato soup, and the ketchup.  Mix well.
Now here's the fun part.  Your pasta?  Don't drain it!  What??  Don't drain? Nope. Using a large slotted spoon or pasta scoop, lift pasta from water and place in beef mixture.  Don't toss the water.  Stir your pasta in the sauce and add one cup of the water from your pasta pot to the mix.  This has all that lovely starch from the pasta in it and makes it taste so good!


Sprinkle a little Parmesan cheese on top, plate up with the salad and freshly buttered bread...you're in heaven!

NOTE:

  • As stated above, you can substitute ground turkey, chicken, pork, veal, etc. for the beef
  • Substitute any small pasta for the macaroni and change it to wheat if you prefer!
  • Use lower sodium/fat/sugar based tomato soup or ketchup to make this a little healthier

Wednesday, February 1, 2017

Peanut Butter No Bake Cookies

I love these.  I'm not kidding.  Like I'd marry them if I weren't already married and one could marry an inanimate object kind of love!  Okay, maybe not that far, but they're yummy and oh so rich!  Eating more than one is a problem for me-unless you have a glass of cold milk with it!

I haven't figured out how to lower the sugar in them by much, but can I just say that they're loaded with yummy, protein-laden peanut butter, fiber-filled oats, milk...that's kinda healthy, right?  Ha ha!  Who am I kidding?!  Enjoy in moderation.  Please.

Peanut Butter No Bake Cookies

I've only shared this recipe a few times.  I had a recipe that my sister used and her no bakes always turned out just right.  Kind of soft, but firm, oats were chewy but not crunchy and it had just the right blend of flavors. You know the kind that you cook for just a minute?  I tried and tried and tried to get this recipe to work for me and it never did! So, I did what any smart woman does and I created my own!

Can you see the pockets of layered goodness?

I love making fudge for gifts, holidays, etc. and when I created a fudge recipe that worked, I just pulled the base items and cooking times in for this recipe.  The result is a mostly-firm, chewy cookie, melts in your mouth, is delicious and a little secret...if it gets too firm for you, you can pop it in the microwave for a few seconds and voila!  Good as new!

I tend to make mine in bar form since they're headed out the door, but you can drop them onto wax paper or a silpat just the same!

You'll need:

Large, heavy bottomed pot
9x13x2 baking dish, buttered/sprayed/greased
Timer
Spatula
1 1/2-2  cups creamy peanut butter
3 cups granulated sugar
2/3 cups milk
1 3/4-2 cups quick cook oats
2 tsp. vanilla extract
1/2 cup butter
1/4 tsp. salt

In a large, heavy bottomed pot and on medium-low heat, place milk and butter and melt.  Do not allow this to boil.  Once the butter has melted, add sugar and stir.  Once the sugar has dissolved, add salt and bring temperature up to medium heat and watch for a boil.  Once the mixture comes to a rolling boil, set your timer for 1:42.  Yes, you're reading it right.  One minute, forty-two seconds. Stir the mixture the whole time it boils to keep the sugar from scorching.  You don't want to burn this and have to start over.  There's no fun in that.


This is hubby's favorite part!

As soon as the timer goes off, remove mixture from pan and add vanilla.  Fair warning!  Most vanilla extract has some alcohol content in it and it may create a chemical reaction when hitting the boiling mixture.  Stir the vanilla in and add your oats.  Why?  You want them to get a minute or so to "cook" so that they're not quite done but not crunchy, either.  Add two cups if you want super thick cookies.  1 3/4 if you want them softer and less thick.

Stir them well and start by adding a cup of peanut butter.  If the mixture sticks to the spoon in clumps, don't add more peanut butter.  If it's thin, add the additional amount.  Mix well and either pour into a greased/buttered/baking sprayed 9x13x2 pan and if you can resist them, allow them to cool.  OR, you can drop them by spoonful onto wax paper or silpats and have actual cookies.

This particular pan came out rather firm!

They don't normally make it that far in my house.  I have to hide them just to get them to the cooling stage.

NOTE:

  • You can use natural peanut butter in this.  Or crunchy!  The natural peanut butter has more oil and you'll get a really smooth texture from it.  It's yummy!  It's usually less sweet so you'll get a savory cookie!
  • Butter:  do not substitute margarine for butter!  It has a high water content that changes the recipe.  Not good!
  • Milk:  I use whole milk.  I've used evaporated, 1%, 2% without any issues.  Low-fat evaporated doesn't do so well.
  • Vanilla:  I make my own vanilla.  Yes, I'll share the recipe.  Not today.  Mine is made with a bourbon base and may have something to do with the texture of my cookies being a little different than those of someone who'd use a traditional vanilla extract.  It's okay.  They're good, no matter how you slice them!
  • Oats:  use quick cook!  The whole oats take a long time to cook and don't work in this recipe!  If you like a really thick, almost brittle cookie, you can add another cup of oats and cut back on the peanut butter to 3/4 cup.  It's a much lighter flavored cookie and definitely crunchier than the original recipe!
  • Want chocolate peanut butter no bakes?  Add 1/4 cup Hershey's (or your favorite brand) cocoa powder to the sugar and add to butter/milk mixture as noted.  
Tell me what you think!  How'd your recipe turn out?


Wednesday, January 25, 2017

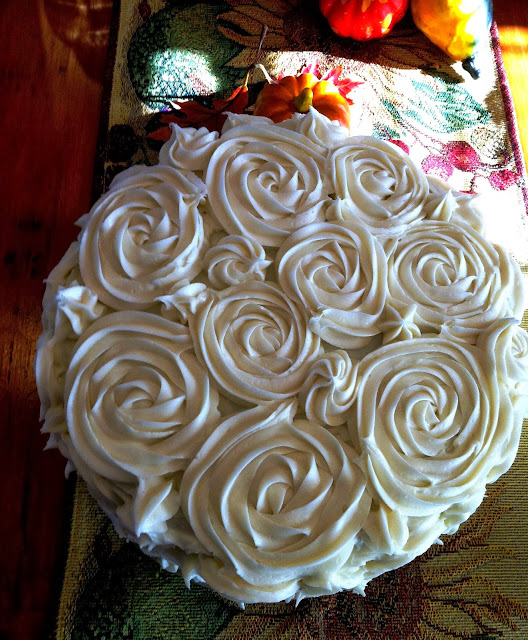
Chocolate Rosette Cake

This is a fan favorite with my friends and family.  They ask for it for birthdays, family dinners, holidays...no reason at all.  And what's not to love?  Creamy, smooth chocolate frosting, loaded with flavor and oh so decadent...hooked yet?

Chocolate Rosette Cake.  Yeah.  I went there.

The best part, is once you get the rosette part down, you can transfer the idea to any other cake like this carrot cake that I made for Thanksgiving last year!
Carrot Cake in Rosettes
Sometimes, you find something that's perfect the way it is and you don't need to make changes to it!   It's that simple Hershey's recipe that I blogged about not too long ago!  It's their "Perfectly Chocolate Cake", and I agree wholeheartedly with the title!

I doubled the recipe, and baked it per directions in two 10" round cake pans (mix one batch of batter, pour into one pan, mix second batch of batter, pour into second pan).  I used the Wilton cake pans that you can find at any bigger brand craft store.  Spray them liberally with baking spray with flour and measure the batter equally into each pan.  Lift the pan a few times and tap it on the counter to get rid of any air bubbles.  I baked it at 350 F for about 27 minutes, then removed from the oven and cooled for 10 minutes in the pan.  I then inverted them onto a cooling rack where they sat, covered in a kitchen towel to cool completely.

I made a mess of the frosting recipe when I made this the first time! Instead of the 1/3 cup of milk it called for, I put in 2/3 cups and couldn't remove it because I'd already started mixing it!  Argh!  I needed to recover it and quickly!  I didn't have anymore Hershey's baking cocoa on hand, so I did what every smart cook does.  I added more powdered sugar.  Then I got it too thick!

The light bulb over my head literally went off when I added a little bit of cream cheese frosting.  It would work to thin the frosting out, just not too much!

Chocolate Rosette Cake-so moist, so delicious.  One piece is not enough!
Frosting recipe:  follow directions on the site, add 3 cups of powdered sugar, 2/3 cups of milk   (instead of the 1/3 called for) and  3/4 cup cream cheese frosting (I'm sure canned frosting would work just as well, as it only mellows out the flavor a little but makes the frosting completely workable for decorating).  OR, if you prefer, use the frosting recipe included on the can but double it.  This cake is quite beautiful without the rosettes, as well!

Now, I'd normally tell you how to decorate it, that's not my forte.  I'm going to link you to a video that shows you how so that it's clear and concise.  This video is as close to what my rosettes looked like as I can get. There are some better ones out there than mine, go for it and make it look as pretty as you can. Like I said, this is only my third time decorating a cake like this, but it's been a big hit so far!
Chocolate Rosette Cake
Note:  I have yet to try and lower the fat or sugar content in this cake.  One piece is almost too much as it's so rich in flavor.  However, when I get to that moment in time, I'll update and let you know how it went.

Cake and frosting recipe adapted from www.hersheys.com, "perfectly chocolate cake".

Tuesday, January 24, 2017

Peanut Butter Pie

I'm having a Homer Simpson moment where I can imagine this luscious, thick, creamy, delectable peanut butter pie and find that drool is dripping off my chin.
Okay, I retract the last part.  Eeewww.  This pie, though.  Mmmm!

Peanut Butter Pie

This is one of the simplest pies you can make. It gets rave reviews every single time I make it and people ask for it for their birthdays in place of cake!  That's pretty good, right?

The key to the pie is to have your ingredients at room temperature as it'll make them easier to work with.  For this you'll need:

Large bowl
Chocolate graham cracker pie crust
16 oz. whipped topping, divided
1 cup creamy peanut butter
3/4 cup powdered sugar
8 oz. block cream cheese
1 tsp. vanilla
Peanut butter cups (this one is in your control!), chopped
Chocolate syrup/fudge sauce

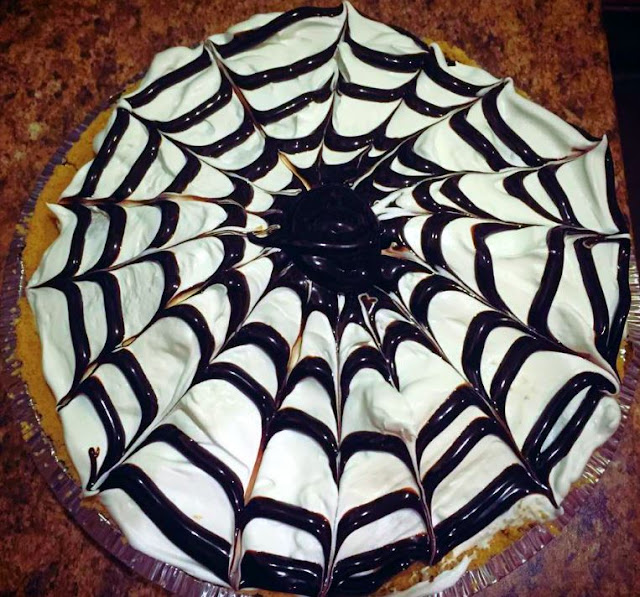
In a large bowl, mix softened cream cheese with peanut butter with an electric mixer.  Add powdered sugar, 8 oz. whipped topping and vanilla.  Mix until thick and creamy.  (optional:  chop 6-8 small peanut butter cups into chunks and mix)  Spread mixture in pie crust.  Top with remaining 8 oz. whipped topping.  Using the chocolate syrup, drizzle over top the whipped topping and toss on a few more peanut butter cup pieces.  OR, you can follow my idea below and use hot fudge sauce, heated just enough to make it thin-draw concentric circles on pie.  Once you have them from center to outer edge, use a toothpick to drag from the center outwards creating a web effect.  If you play with this idea, you can come up with lots of patterns!
Check out this one made with a traditional graham cracker crust!

The best part of this:  you can use lower fat, lower sugar ingredients but be fair warned that they don't always come out as creamy as the higher fat/sugar products.  I've substituted light whipped topping in this and it worked great.  I've used sugar free syrup and a low sugar peanut butter.  They all tasted great.  Try it and tell me what you think!

Monday, January 23, 2017

Salsa-Not the Dance

I love salsa!  I can it almost every year because come winter, tomatoes are a little expensive and I don't like to pay for them or like the taste of an out of season tomato.  Picky, picky.  I know!  But, it's so worth it and this recipe will knock your socks off!


Get all of your ingredients together in one place. 

For this recipe, you'll need:

6-8 Roma tomatoes
4-5 cloves of garlic, peeled, minced
1/2 white onion, diced
1 bunch cilantro, chopped
2 cans tomatoes with green chiles, original, mild or hot
2 tablespoons lemon juice (fresh preferred)
*2-3 tablespoons lime juice (fresh preferred)
2 jalapenos sliced, seeded, de-veined and minced (you can substitute any pepper)
1/2 tsp. salt
1 tsp. onion powder
2 tsp. garlic powder

*if you really love the sharp contrast of the lime against the other flavors, you can increase it!

I used to be a Pampered Chef consultant.  I loved the work, the product even more.  It might've created a Kitchen Gadget Monster in me.  That's for another blog.  I do still have a few tools left that I really love and while I'm not paid by anyone to tout their products, if they're great, I'm gonna give them a shout out!

I love, love, love the Pampered Chef Food Chopper.  I've had mine about ten years and used it for nearly everything you can imagine.  From the picture above, you can see that I really prefer my salsa as pico, but hubby prefers it minced, hence the chopper.  It's so easy to use.  Simply cut your veggies into strips or chunks, place the chopper on top and plunge away.  The blades rotate and chop creating either a rough chop or a fine mince.  The cost is nominal in comparison to the use you'll get out of it.  It's great for chopping nuts, too!

Nom. Nom. Nom.  Enough said.

So, to start, have a cutting board handy along with all of your ingredients and tools.  The musts for this are a really sharp knife, can opener (another Pampered Chef favorite), and a deep bowl.

I begin by clipping the ends from my cilantro and soaking it in a bowl of cold water to clean out any sand in the leaves.  Nobody wants that kind of crunch in their salsa!  I then start peeling my garlic and onion.  For the garlic, after breaking the head apart and getting the cloves I need, I place them in a small jar with a lid and shake them.  This removes the peels and all I have to do is chop the ends off before dicing.

The onion is another matter.  Since I'm using only half of an onion, I slice it so that the root is still intact on both pieces.  Supposedly, this is going to keep it from spraying juice everywhere (i.e. in my eyes!).  Just pull the outer skin and any damaged skin under it off and discard.  I do a rough chop, place part of that under the food chopper and proceed to mince away.

Once the cilantro has soaked and been rinsed several times, I repeat the process with it and place it in the bowl with the onions and garlic.  This is where the fun comes in.  I really want to draw the flavor out of these, so I sprinkle my salt, garlic powder and onion powder on top of them along with the lemon and lime juice.  Give it a little stir before adding the canned tomatoes with green chiles.
Now, take care of your peppers.  I used jalapenos in this one, but have been known to use Serrano or habanero peppers in their place or alongside.  It just depends on how much heat you can handle.

Aren't they gorgeous?

Next you'll want to rinse your tomatoes and dice them with the knife.  If they're really firm the food chopper will do a great job, but if not, you'll just end up with a mess on your cutting board.  Place them in the bowl with the other ingredients and stir, mixing well.  Allow to sit for 1/2 an hour or so before serving to allow flavors to marry.

Roughly chopped.  Isn't it gorgeous?  I could eat this for breakfast!

My favorite thing to eat salsa on is a burrito topped in a homemade chili sauce, melted cheese and a few lime tortillas.  I place it on my enchiladas, tacos, sandwiches, omelets, you name it!  I've even been known to put it in the blender and drink it!  

Refrigerate any leftovers (uh, yeah, like that's gonna happen).  I've also taken small amounts (1/2 cup or less) and pour into ice cube trays.  Freeze, place in a zip bag once frozen and take out when you need a little oomph added to your soup recipes!  This is a great addition to taco soup!

NOTE:  No fat, low calorie, high in flavor food that's great for you!

Friday, January 20, 2017

Sunshine Cake

Have you ever had something so wonderful, so light, so delightful that it felt like you had a mouthful of sunshine?  I have!  I've made variations of this cake before with different names, but after making this and having a friend tell me it was like a mouthful of sunshine, I decided that I was going to share it under that name!  Clever, eh?


This lovely creation is so simple to make! Trust me!  All you need are:

1 box lemon cake mix, plus ingredients called for in directions
1 box instant lemon pudding mix
4 Tbs. lemon juice
4 Tbs. corn starch
1/3 cup granulated sugar
1 tub whipped cream topping, thawed
2 cans crushed or chunked pineapples with juice


So, the key to making any dish is to gather all of your ingredients into one place. Unlike me who always forgets at least one.  Put everything you need, ingredients, measuring utensils, bowls, cooking spray (see, I forgot to mention that above!) on the counter, preheat your oven to 350°F or whatever your cake mix calls for and get ready to make an uber tasty cake!

Spray 9x13x2 baking pan with baking spray.  Set aside.  In a large bowl, place cake mix, pudding mix, eggs, water and oil (or your substitutes), mix well-you can do this by hand-it's great exercise, but if you have an issue, use your mixer. I love a fluffy mix so I use a whisk and go to town on it!

Pour into prepared pan and take the time your mix calls for and add 4 minutes to the baking time.


While this is baking, in a small,but deep and wide pan (or skillet), pour two cans of pineapples (chunked or crushed) with juice, granulated sugar and with heat on medium high, bring to a boil.  Once it comes to a boil, turn it down to medium heat.


In a small bowl, mix cornstarch and lemon juice together, noticing that I used equal amounts.  Juice should be room temperature or cold so that it'll mix with the cornstarch.


While stirring the bubbling pineapples, add this mixture and keep stirring.  In 2-3 minutes you'll notice the color of your mix turn from a milky white to an opaque cream and it'll thicken considerably.  Cook for a total of five minutes while stirring and remove from heat.  Place in a heat safe bowl and refrigerate.


When cake is done, remove from oven and cool completely.


Frost with whipped topping and spoon cooled pineapple mixture over top.


Your taste buds will love you forever.

The corners are my favorites.

Here's the kicker.  You can make the low-fat version of this cake by using simple substitutions in the cake mix like applesauce for oil, liquid eggs (lite) for the eggs, sugar free pudding mix and light topping!  You can find great hacks here!! If you do a lighter version, let me know your thoughts!  I find that the cake is usually denser if I use applesauce in place of oil, but other than that, it's still just as tasty!

Wednesday, January 18, 2017

OMG Cheesecake Cookies

I'm not an advocate for our acronym-ladened social language, but for these, I couldn't resist!  I had an event that I had to go to and wanted to make something kind of dressed up, but irresistible and I found the perfect recipe!  The recipe I found was for a cheesecake flavored chocolate dipped cookie.  Yummy!  I love cheesecake and know just how easy it is to change the flavors of it, so I set out to make this delicious concoction!
"Orange Cream OMG Cheesecake Cookies"

Here's my adaptation of the recipe:

8 oz cream cheese, softened to room temperature
1/2 cup butter, softened to room temperature
1 cup sugar
2 eggs
1 tsp vanilla extract
2 3/4 cups self-rising flour

Beat cream cheese and butter together. Add sugar to the butter mixture and cream until mixture is smooth. Beat in the eggs and vanilla.
"Coconut-Chocolate-Almond OMG Cheesecake Cookies"
In a separate bowl, whisk the flour, to sift it. Gradually add the flour to the butter mixture and mix until well combined.
Drop by rounded tablespoons onto a parchment paper-lined cookie sheet. (You can also put a little flour on your hands and shape these cookies, if you want a uniformed look).  Bake at 350 degrees for 12 minutes.


OPTION ONE: Add 1/2 tsp. almond and 1/2 tsp. coconut flavorings to the batter.  Bake as directed.  Melt 1/3 bag milk chocolate, 1/3 bag semi-sweet and 1/3 bag 70% cacao chocolate chips plus 2 Tbs. vegetable shortening in a double boiler.  Once melted, dip 1/3-1/2 of the cookie in the chocolate and place on wax paper surface.  Sprinkle with slivered almonds and sweetened, shredded coconut.  Allow to dry completely.

OPTION TWO:  Add 1 tsp. orange flavoring plus 1/4 tsp. lemon oil (I found mine in the candy section at AC Moore) and a little orange food coloring (I used about 1/4 tsp) to the batter and bake as directed. Instead of dipping these, I drizzled the chocolate over them.  

All night long during the event, I kept hearing, "Oh My Gosh, these are the best cookies ever!"-hence the name!  Use your imagination on these cookies.  If it tastes good with chocolate, use it!  I have in mind to do some raspberry flavored ones with all dark chocolate.  Mmmm!

Tuesday, January 17, 2017

Minute Steaks Dinner-A Story


Minute steaks, Brussel sprouts with onions and bacon, creamed potatoes and homemade biscuits, yes please.
Minute Steak, Brussel Sprouts with bacon and onion, Creamed Potatoes and  Homemade Biscuits

Dinner isn't always a work of art.  Sometimes, I'm in a hurry and just need to get things done and dinner on the table.  Sometimes, I forget to plan ahead. Sometimes, I have to defrost things from the freezer in the microwave (grrr) but most of the time they turn out just fine! 
Add 2-3 Tbs. vegetable/canola oil to pan, toss in steamed sprouts, pre-cooked bacon and onions.  Toss and heat.  

Let me start by saying that I love Brussel sprouts!  Love them!  I didn't always!  I think I could find any excuse in the world not to eat them, why they didn't taste good, how they made my tummy hurt...seriously.  My poor mother!

This dinner is a quick fix!  Like 30 minutes flat.  I had to thaw some ground chuck because I forgot to set it out, but while it was thawing, I put a bag of frozen Brussel sprouts into a pan of water and brought them to a boil.  As soon as they boiled, I turned them off, and put a lid on them.  I wanted them bright green but not mushy or waterlogged.  However, in my rush to make sure things were cooked to perfection, I added one too many irons to my fire!

While this was going on, I baked a pan of bacon (line your baking sheets with aluminum foil, lay bacon out flat, put in a cold oven, turn on 400 for 15-18 minutes) and sautéed some onions in a saucepan with a little veggie oil.  If you're in a bigger hurry than I was, just use real bacon bits!
A few too many irons in the fire yielded this tasty mess.  Creamed Potatoes.  

I also had a nice pan of russet potatoes on to boil in some lovely, low-sodium chicken broth.  Oh, the kitchen smelled so good.  While I was multi-tasking, I put together a pan of biscuits (homemade) and baked them off while the bacon was finishing.  I used a 10” and 6” iron skillet, coated well with baking spray to prevent sticking.  I have this trick that I use when I'm in a hurry or don't want to take all the decorations off the kitchen table.  I take a baking sheet, line it with foil and use it to roll out my biscuit dough.  Before you toss the foil, use it for your steaks!  I sprinkled some salt, pepper, garlic powder and onion powder on the sheet, tossed it around a bit and coated my steaks in an egg wash (1 egg + 1 tablespoon water, whisked) then placed it on the flour and coated it well.  I heated about 3 tablespoons of canola oil in a heavy bottomed skillet and tossed in the “steaks”.  They literally don't take more than 2 minutes on each side; even less if you want them less than well done. 
1 lb. lean chuck, 1 egg, 1 tablespoon water, mixed with onion powder, garlic powder, salt and pepper.

Get in there with your hands, shape meat mixture into four equal sized patties, toss into  all-purpose flour.

Coat both sides of the patty.

In a preheated skillet, add 3 tablespoons canola/vegetable oil, place patties down and allow to cook 2-3 minutes on each side, depending on thickness.  Flip once.  Serve after having rested for a few minutes.
Now, can you guess what happened?  It all got done at the same time!  I was yelling for hubby to come and take the biscuits and bacon out of the oven while I was rushing to drain the Brussels sprouts and potatoes and to prevent the steaks from burning!  Wow, what a scenario!  I think it was probably quite funny and I’m glad I don't have any close neighbors!  So, meal saved.  While the steaks were resting, I took the sautéed onion, added 1 slice of bacon, chopped to it and tossed in the drained Brussels sprouts.  I gave it a good toss to coat the sprouts with the oil and yummy flavors and heated it just allowed it to permeate.

While doing this, I had meant to make mashed potatoes but I mashed the potatoes, added a little butter, salt and pepper, a little starchy broth that they'd cooked in and some sour cream, stirred it, gave it a good taste and set it on the stove to keep warm.  In my rush, I forgot that I’d already put in the sour cream so I gave it another good dollop of sour cream and a dash of heavy cream and I got runny potatoes!  Yuck!  A little quick thinking and voila! creamed potatoes.  Do you really need the recipe?  Just add too much liquid to your potatoes.  They were really, really tasty and really, really heavy!  A little goes a long way!

So, dinner was saved, done in less than a half an hour and I made a promise to myself to not rush another meal!

NOTE:  Leftovers have a way of either being really good the second time around or really terrible.  This meal gets better the second time!  All the flavors have time to marry and oh my, they're wonderful!  Freeze?  You can freeze the meat after it's cooked, but I'd forgo the sprouts and potatoes.  Not tasty after being frozen and consistency is mushy!
Print Friendly and PDF